
How Can We Help?
CommandHMI: Import, Export, Compile and Run C Scripts
Overview
A C script only runs on the HMI once it has compiled successfully and has been assigned an execution mode.
The workflow is always the same:
- open the Script Editor
- create or import the script
- compile it
- assign it as a Global, Init or Trigger script
| Execution mode | When it runs | Where to set it | Limit |
|---|---|---|---|
| Cyclic (Global Script) | Continuously, at a set frequency, optionally gated by a bit | Setting > Global Script | 64 scripts, run in list order |
| Cyclic (Timer control) | At a set frequency, always or while a bit is ON | Timer object placed on a screen | 0.1 s to 60 s |
| Init Script | Once, at HMI startup, independent of screens | Setting > Init Script | 64 scripts, run in list order |
| Trigger Script | When a bit changes state, or a screen opens/closes | Setting > Trigger Script | — |
Every new script starts from this template. Keep the spelling MarcoInit exactly as shown: it is the macro name defined in the editor’s header file.
#include "MacroInit.h"
//#include "subFun1.c" //Example: sub script
void Macro_main(IN *p)
{
	MarcoInit
	//ToDo
}
Step 1 – Open the Script Editor
Open your project in CommandHMI, then open the Script Editor
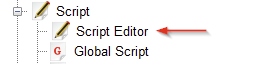
The editor window has 3 main areas:
- Script list (left) – scripts sorted by state:
- Success (compiled OK)
- Fail (compile errors)
- Not compiled
- Not saved.
- Script edit window – the C source code
- Setting and output window (bottom) – the Variable Setting tab and the Compile information output tab.
Step 2 – Create or paste or import a script
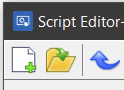
To create a new script or paste another one
- Click New icone, give a name and the new script appears in the unsave list
- Paste or write the code in the edit window.
- In the Variable Setting tab, double-click (or right-click > New Variable) to declare the variables linked to HMI addresses: name, data type, read/write, address. Variables declared here, or taken from an address library, do not need to be declared again in the code. Script-internal variables are declared in the code as usual.
- Click Save.
To import an existing script
- Click on Import/Open icone
- Select the script file previously exported from another project (see Step 3).
- Check the code and the Variable Setting tab: the addresses must match the current project.
- If the script calls sub scripts with
#include "subXxx.c", make sure those sub scripts are also present in the project.
Step 3 – Export a script
Export a script to reuse it in another project or to back it up.
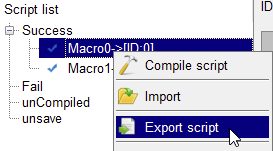
- Select the script in the script list
- Right click Export script
- Choose the folder then confirm by OK. The script is saved as a
*.csvfile.
This file is the one you select later with Import.
Step 4 – Compile the script

- Select the script and click Compile in the edit window toolbar. The editor saves, compiles, links and checks the script in one step.
- Read the Compile information output tab:
- “0 errors! Compile successfully” – the script moves to the Success list and can now be assigned an execution mode.
- Errors listed – the script moves to the Fail list. Fix the lines reported and compile again.
Only scripts in the Success list appear in the Global, Init and Trigger script dialogs.
Step 5 – Run the script
Pick one execution mode per use: Init, Cyclic, Timer, Trigger,.. A script that is compiled but not assigned never runs.
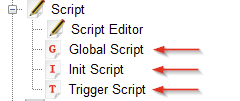
5.1 Cyclic execution – Global Script
Use this for logic that must run all the time, whatever screen is displayed (50 ms or more).
- Open Setting > Global Script.
- Select the compiled script in the list.
- Set the execution frequency.
- Optional: enable bit control and enter a bit address (e.g.
LB100). The script then runs only while this bit is ON. - Click OK. Up to 64 global scripts can be added; they run in the order of the list.
5.2 Cyclic execution – Timer control (alternative)
Use this when the script should run only while a given screen is open.
- Place a Timer object on the screen (it is not visible at runtime).
- Execution mode: Always Execute, or Address Triggered (runs while the bit is ON).
- Frequency: 0.1 s to 60 s.
- Execution Times: 0 = run forever, otherwise the number of runs.
- Function type: Macro, then select the script Name.
5.3 Run once at startup – Init Script
Use this to initialize values when the HMI powers up.
- Open Setting > Init Script.
- Select the compiled script in the list.
- Click OK. The script runs once at startup, independent of screens. Up to 64 init scripts, run in list order.
5.4 Run on an event – Trigger Script
- Open Setting > Trigger Script and click New.
- Select the compiled script.
- Choose the trigger type:
- Address trigger – enter a bit address and a mode: OFF→ON, ON→OFF, OFF↔ON (any change), or Immediate execute when ON.
- Screen trigger – select a screen and a mode: Open Screen or Close Screen.
- Click OK. Use Alter or Delete to manage the trigger list.
Download to the HMI
Compile the whole project with Download > Compile, then test with Off-line Simulation or send it with Download > USB/Ethernet download.
Tips and common pitfalls
- Keep
MarcoInitspelled this way in every script.MacroInitcauses a compile error. - Keep cyclic scripts short. No blocking loops or long
DELAY()calls: they slow down the HMI. - With a bit-triggered script, reset the trigger bit in the script if it must fire again.
- Bits LB50000–LB51999 and words LW50000–LW51999 keep their value after a power loss. Use them for counters or settings that must survive a restart.
- After an import, recompile the script: an imported script is not in the Success list until compiled in the new project.